This is part 2 of the guide that is for those who want to start developing plugins for Spigot. In this part we will create a simple command that writes “Hello Player Name” to the player who write command /hello on the test server,.
Step 1. Create class that runs the command.
- Right-click the package where the Main class is to create a new class called “
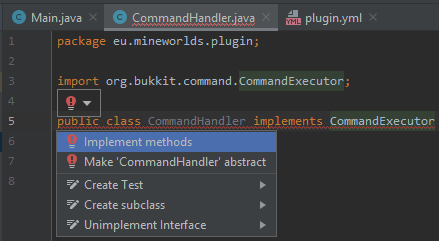
CommandHandler“. (The name is optional and can also be eg “HelloCommand”) - Inside the class, you should now implement “CommandExecutor” which is an interface used to execute commands.
- Select “Implement methods” in the red bulb, or press Alt + Enter to open the menu, and select “Implement methods”. Enjoy OK.
4. rename “commandSender” to “sender” and “strings” to “args” to make it easier to use these variables in the command. Change also “return false” to “return true“.
The code should now look like this:
package eu.mineworlds.plugin;

import org.bukkit.command.Command;
import org.bukkit.command.CommandExecutor;
import org.bukkit.command.CommandSender;

public class CommandHandler implements CommandExecutor
{
    @Override
    public boolean onCommand(CommandSender sender, Command command, String s, String[] args)
    {
        return true;
    }
}
CommandSender are the items that are sent by the server when someone writes a command, for example /hello . Usually there are two types of ways a command can be sent, either by a player in the game or from the server terminal. If you want to check if the sender is a player, you can for example make the following code:
if (sender instanceof Player)
{
    //The transmitter is a Player
} else
{
    //Broadcaster is something else, t.ex server-terminalen
}
The transmitter always has a name, so in this case we do not need to do this check. We want to send back “Hello Player Name” to the transmitter when the write command in either chat or server terminal.
This can be done through
sender.sendMessage("Message");
We then put this into OnCommand method, before return true;. To add the sender's name can we do:
sender.sendMessage("Hello " + sender.getName());
Now the command class completed!
Step 2. Register command in plugin.yml
- Add command at the end of your plugin.yml file:
commands:
  hello:
    description: sends hello
    Usage: /hello
This means that the server detects that the command exists when the plugin is loaded. “description” contains a brief info string of what the command does, and “usage” only contains information about how to use the command, syntaxmässigt. Read more about this in documentation plugin.yml
Step 3. Register command in the Main class.
Add this to your onEnable()-metod:
getCommand("hello").setExecutor(new CommandHandler());
The method should now look like this:
@Override
public void onEnable()
{
    getServer().getLogger().log(Level.INFO, "Hello World!");
    getCommand("hello").setExecutor(new CommandHandler());
}
Step 4. test command.
Now you can log on to the test server and write /hello in the chat, or write command in Terminal. Does it work like it should, it should now be “Hello Player Name”.